Fall is here, and with it comes the cozy feeling of crisp air, warm drinks, and, of course, pumpkins! There is something truly special about these round, cheerful gourds. So, too it's almost time for everyone to get creative. Perhaps you've been thinking about adding some seasonal cheer to your home, or maybe you just want to try a fun new art project. Drawing a pumpkin can be a wonderfully rewarding activity for anyone, no matter your current skill level.
Many folks feel like drawing is a special gift, something only "talented" people can do. But actually, as a matter of fact, drawing is a skill, not some magical talent you either have or don't. It's like learning to ride a bike or bake a cake; you get better with practice. We're here to help you learn how to get started, step by simple step. You really can make a lovely pumpkin drawing.
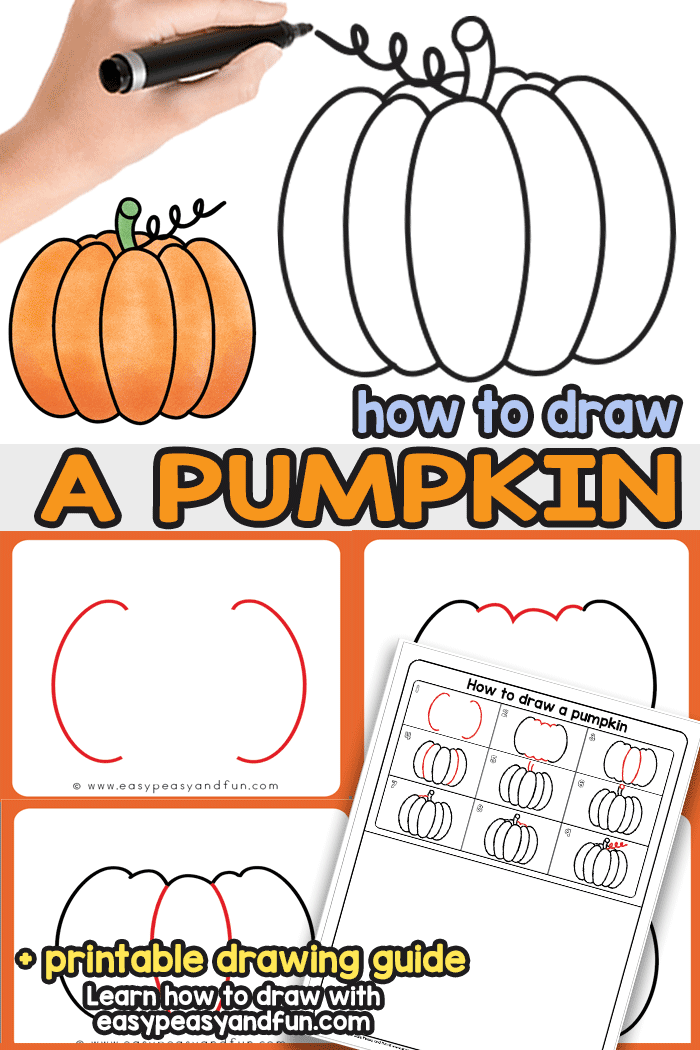
This helpful guide will show you exactly how to draw a pumpkin, from its basic shape to adding all those fun details. We'll look at simple techniques that make it easy for you to create your own autumn masterpiece. You'll learn how to make it look round, add a stem, and even give it a spooky or happy face. By the way, we'll even touch on making your drawing look three-dimensional, just like creating 2D and 3D lines in a program, but with a pencil and paper instead.
Table of Contents
- Gathering Your Art Supplies
- Getting Started: The Basic Pumpkin Shape
- Adding Those Signature Pumpkin Ribs
- Drawing the Stem and Vine
- Bringing it to Life: Shading and Depth
- Carved Creations: Drawing Jack-o'-Lantern Faces
- Beyond the Basics: Pumpkin Variations and Styles
- Tips for Making Your Pumpkin Drawing Shine
- Common Drawing Questions
Gathering Your Art Supplies
Before you start putting pencil to paper, it's a good idea to gather what you'll need. You really don't need anything too fancy to get going. Just some basic tools will do the trick for your pumpkin drawing project.
You will want a pencil, naturally. A regular graphite pencil, perhaps a B or 2B, works very well for sketching. You'll also need an eraser, of course. A kneaded eraser is pretty good because it can lift graphite without smudging too much. Then, get some paper; any kind of drawing paper or even just printer paper is fine to begin with. Some folks find a simple ruler helpful for initial guides, but it's not strictly necessary.
If you want to add color, you could grab some colored pencils, crayons, markers, or even watercolors. For a truly unique touch, you might even think about using digital tools. Just like how some people draw lines in modern OpenGL by batching, or use programs like draw.io for diagrams, there are plenty of digital art apps that let you draw on a screen with a mouse or stylus. This can be a fun way to experiment with different looks and colors without making a mess.
Getting Started: The Basic Pumpkin Shape
Every drawing starts with a basic form. For a pumpkin, this means thinking about its overall shape. You might think of it as just a circle, but it's a little more than that, actually. We'll build it up step by step, which is kind of like how a program starts with just a small piece of code and grows from there.
Starting with a Simple Circle
To begin, lightly draw a large, somewhat squashed circle or oval shape in the middle of your paper. This will be the main body of your pumpkin. Don't press down too hard with your pencil here, as these lines are just guides. You'll be adjusting them later, so a light touch is very helpful.
Think of this initial shape as the core, the central mass of your pumpkin. It doesn't have to be perfectly round, either. Pumpkins in nature are rarely perfectly symmetrical, so a slightly uneven circle can give your drawing a more natural, organic feel. This is basically your foundation, the spot where everything else will attach.
Adding the Pumpkin Sides
Now, on either side of that central circle, add two more, slightly smaller, curved shapes. These should overlap the main circle a bit. They are like the "cheeks" of the pumpkin, making it wider and giving it that classic, full appearance. These shapes help create the roundness you see in a real pumpkin.
These side sections should flow smoothly from your main circle. You're building up the overall silhouette here, making it look more like a pumpkin and less like a simple ball. You can make these side sections a little flatter or rounder depending on the kind of pumpkin you want to create. It's really up to you.
Adding Those Signature Pumpkin Ribs
The distinct, segmented look of a pumpkin comes from its "ribs" or vertical ridges. These are very important for making your pumpkin drawing look real and three-dimensional. They give it a lot of character, too.
Curved Lines for Form
Starting from the top center of your pumpkin (where the stem will eventually go), draw curved lines down towards the bottom. These lines should follow the roundness of your initial pumpkin shape. Think of them as lines that wrap around the form, giving it volume. You'll want to space these lines out fairly evenly around the pumpkin's body.
Each line should slightly curve inward towards the center of the pumpkin before curving back out to meet the bottom edge. This slight curve is what creates the illusion of a rounded, segmented surface. It's like drawing different sections of a sphere, making it feel like you could almost pick it up.
Making it Look Round
Continue adding these curved lines until you have covered the entire pumpkin. Some lines will be more visible on the front, while others will curve around to the sides, almost disappearing from view. This helps emphasize the pumpkin's roundness. You can use your eraser to clean up any overlapping lines from your initial circle or oval shape now, too.
These lines are what make a pumpkin look like a pumpkin, rather than just a smooth ball. They give it that familiar texture and shape. Remember, the goal is to make it look like it has distinct sections, almost like slices, but still connected as one whole piece. This part is pretty fun, actually, as you start to see the pumpkin truly take shape.
Drawing the Stem and Vine
No pumpkin is complete without its stem! This small detail really brings the whole drawing together and gives your pumpkin a natural look. It's a bit like the final flourish, you know, that little something extra.
The Sturdy Stem
At the very top center of your pumpkin, where all those curved lines meet, draw the stem. A pumpkin stem is usually a bit thick at the base and then tapers slightly as it goes up. It's often not perfectly straight, either; it might have a slight bend or twist. You can draw two slightly curved lines going upwards, then connect them at the top with a wavy line to give it some character.
You can add some texture to the stem with a few small, vertical lines or tiny bumps. This makes it look more woody and realistic. Think about how a real pumpkin stem looks; they're often a bit gnarly and rough. This rough texture really helps the drawing feel more authentic, pretty much.
Curling Vines and Leaves
To make your pumpkin even more charming, you can add a curling vine or a few leaves around the stem. Vines are just simple, spiral-like lines that twist and turn. They can wrap around the stem or extend out from it. Leaves are also quite simple; you can draw a basic heart shape or a more jagged, lobed leaf shape, depending on how detailed you want to get.
These extra bits of greenery make the pumpkin feel like it's fresh from the patch. They add a touch of natural beauty and can fill out the top of your drawing nicely. You can make the vines long and flowing, or just a small curl. It's all about adding a bit of life to your drawing, giving it a bit of personality, too.
Bringing it to Life: Shading and Depth
Shading is what makes your two-dimensional drawing look like a three-dimensional object. It gives your pumpkin form and makes it pop off the page. This is where your drawing really starts to feel solid, you know, like it has weight.
Finding Your Light Source
Before you start shading, decide where your light is coming from. Is it from the left, the right, above, or below? This decision is very important because it tells you where to place your shadows and highlights. For example, if the light is coming from the top left, the top left side of your pumpkin will be brightest, and the bottom right side will be darkest.
Mentally (or even lightly with a pencil) draw an arrow indicating the direction of your light source. This simple step helps you stay consistent with your shading throughout the drawing. It's a bit like setting up the parameters for a digital plot, where you define the axes before drawing your data points. Knowing your light source is a fundamental part of making anything look real.
Gentle Shadows and Highlights
Now, apply shading using your pencil. The areas farthest from your light source will be the darkest. The areas closest to the light will be the brightest. You can use different pressure on your pencil to create darker and lighter tones. For the ribs of the pumpkin, the parts that stick out more will catch more light, while the valleys between them will be darker.
Don't forget to add a cast shadow beneath your pumpkin. This shadow helps ground the pumpkin and makes it look like it's sitting on a surface, rather than floating in the air. A cast shadow is usually darkest right under the object and gets lighter and softer as it moves away. This really makes the pumpkin feel like it's part of the scene, you know, truly there.
Carved Creations: Drawing Jack-o'-Lantern Faces
Once you have your basic pumpkin shape, you can turn it into a classic jack-o'-lantern! This is where you can really let your personality show. You can make it spooky, funny, or even a little bit silly. It's pretty much all up to you.
Simple Shapes for Faces
For eyes, triangles or simple circles are a great place to start. For a nose, a smaller triangle often works well. And for the mouth, a wide, jagged line with a few "teeth" is pretty classic. Remember, these are supposed to be carved shapes, so they don't need to be perfectly smooth or round. A bit of imperfection can actually make it look more authentic, too.
You can sketch these shapes lightly first, just to get a feel for where they'll go on your pumpkin. Think about the overall expression you want to create. A wide, toothy grin will give a different feel than narrow, angry eyes. This initial planning is really helpful for getting the look you want, you know, before you commit to the lines.
Expressive Eyes and Mouths
To make your jack-o'-lantern truly unique, play with different eye and mouth shapes. Maybe one eye is bigger than the other, or the mouth is a wonky, crooked smile. You could add small details like eyebrows (just simple angled lines above the eyes) to convey more emotion. A slightly downturned mouth can look sad, while an upward curve is very happy.
Consider the "carved" effect by making the edges of your shapes a bit thick or slightly uneven. This gives the impression that they've been cut out of the pumpkin's skin. You can even add a faint glow effect around the carved areas with a lighter pencil or colored pencil if you're adding color. This really makes it look like there's a light inside, pretty cool, right?
Beyond the Basics: Pumpkin Variations and Styles
Once you've got the hang of drawing a basic pumpkin, you can start to experiment with different types and styles. The world of pumpkins is very diverse, and your drawings can be too! You're not just limited to one look, you know.
Happy and Friendly Pumpkins
For a happy pumpkin, think about soft, rounded features. Give it big, wide, smiling eyes and a cheerful, crescent-shaped mouth. You might even add some rosy cheeks with a touch of color. These pumpkins are all about warmth and welcome, often seen in fall decorations. They tend to be quite inviting, you know, making people feel good.
You could give them a jaunty little stem that curls up, or maybe a small, perfectly round body. The key is to keep the lines soft and flowing, avoiding sharp angles. These pumpkins are really about spreading joy and are quite popular for general autumn themes, too.
Spooky and Mysterious Pumpkins
If you're going for a spooky vibe, sharp angles are your friend. Think about narrow, slanted eyes that look a bit menacing. A jagged, toothy grin with uneven teeth can add a lot of fright. You might even make the pumpkin itself a bit taller and thinner, or more lopsided, to give it a more eerie feel.
Darker shading around the eyes and mouth can make them look like deep, empty voids. A twisted, gnarled stem can also add to the spooky atmosphere. These are the kinds of pumpkins you see on Halloween night, ready to give a friendly scare. They are pretty much a staple for the holiday, too.
Weathered and Decayed Pumpkins
For a more realistic, perhaps slightly unsettling look, you can draw a decayed or weathered pumpkin. This involves adding wrinkles, soft spots, and uneven textures to the skin. The stem might be broken or shriveled. You could even show some mold spots with patchy, darker shading.
The eyes and mouth might be collapsing inward, or the edges could be ragged and torn. This style is all about capturing the natural process of decay, showing the pumpkin at the end of its life cycle. It's a different kind of beauty, a bit raw, you know, but still quite interesting to draw.
Stylized and Decorative Pumpkins
Don't feel limited by realism. You can draw pumpkins in a highly stylized way, too. Think about simplifying the shapes into geometric forms, or using bold, graphic lines. You could add patterns or intricate designs to the pumpkin's surface, almost like a stencil. Some people even draw pumpkins with very exaggerated features, making them cartoon-like.
This is where you can really play with colors that aren't traditional orange, like blues, purples, or even metallics. You could make it look like a fancy, decorated pumpkin for a harvest festival. This approach is very much about artistic expression, letting you create something truly unique and decorative. It's a fun way to push your creative boundaries, honestly.
Tips for Making Your Pumpkin Drawing Shine
Learning to draw is a rewarding journey, and there are always ways to improve and make your art even better. These tips can help your pumpkin drawings really stand out. They're pretty much simple things that make a big difference.
Practice Makes Your Skills Grow
As we mentioned earlier, drawing is a skill, not a talent. The more


Detail Author:
- Name : Gretchen Rodriguez
- Username : mzboncak
- Email : vickie95@hotmail.com
- Birthdate : 2006-04-23
- Address : 524 Feil Forks Port Coleman, VT 65773
- Phone : +1-931-476-5218
- Company : Boyer PLC
- Job : Mechanical Engineering Technician
- Bio : Repudiandae distinctio magnam est nam. Maiores laborum ducimus architecto exercitationem cumque atque. Harum praesentium adipisci qui quo. Et molestiae aut aut dolorem minima.
Socials
twitter:
- url : https://twitter.com/heath9161
- username : heath9161
- bio : Ipsa et ratione sit. Quia sint non voluptatem velit consequatur. Illum sunt accusamus quis soluta. Dolor earum dolorem rerum et qui aperiam dolorem.
- followers : 556
- following : 556
linkedin:
- url : https://linkedin.com/in/gaylord1975
- username : gaylord1975
- bio : Et necessitatibus sequi a eos quia odit.
- followers : 1777
- following : 2500
facebook:
- url : https://facebook.com/heath_id
- username : heath_id
- bio : Sed et culpa fugiat sit. Eos cum eos voluptas incidunt ipsum libero optio.
- followers : 452
- following : 1620
tiktok:
- url : https://tiktok.com/@heathgaylord
- username : heathgaylord
- bio : Consequatur quas a quidem blanditiis et.
- followers : 5611
- following : 2565
